Nothing beats the satisfaction of growing your own garden. Flowers smell more fragrant, fruits taste much sweeter, and plants look much greener when you’ve grown them yourself! As a result, planting is becoming more popular than ever as a relaxing hobby and source of food.
Planting is the process of setting a young plant on the ground and supporting its growing needs. There are quite a few things that a plant needs to grow: sunlight, water, air, soil, and nutrients, as well as your time, patience, and care!
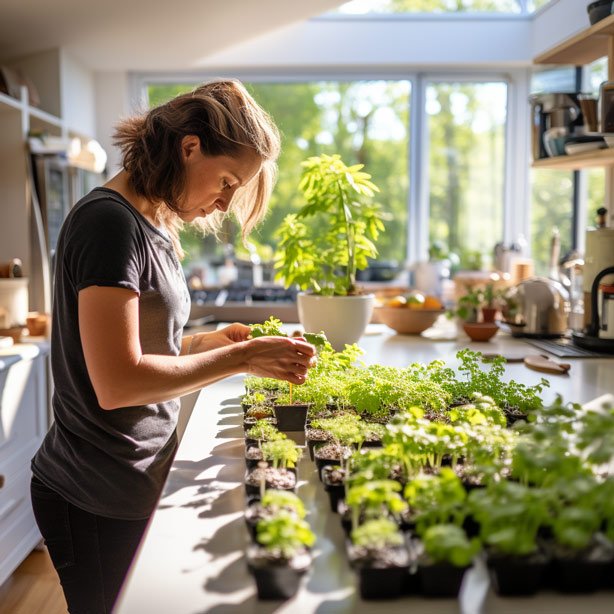
Growing plants from seeds might seem challenging—but it doesn’t have to be. Start by picking high-quality seeds, getting to know their requirements from seed packets, planting them in well-draining soil, and keeping them warm, weed-free, moist, and nourished until maturity.
Don’t have enough space? No problem! You can grow potted plants on a window or balcony. All you need to do is choose a container with drainage holes, fill it with potting mix, place your plant or seed, water it well, and position it in a spot with bright, indirect light.
If you want to know and grow more, you’re in the right place. Welcome to our ultimate planting guide. We’ll show you how to grow all types of plants, so let’s dig in and get started!
- What Is Planting?
- What Is Growing A Plant?
- How to Grow A Plant?
- How to Grow A Plant From Seeds?
- What Are the Requirements for Seeds to Grow?
- How to Plant a Plant?
- What Does Planting Plants Require?
What Is Planting?
Planting a plant is the act of placing a young plant into a hole in the ground and covering its roots with soil so that it can grow. Planting also involves selecting a site, picking a plant, preparing your soil, and caring for your plant until it’s strong, healthy, and well-established.
The best time to plant would be spring and autumn when the weather is mild. Summer can be too hot and harsh for plants, while in the winter, most young plants aren’t able to withstand the wind and snow. Cloudy days and early mornings have a cool temperature, ideal for planting.
A hand trowel, watering can, utility knife, and a good pair of gardening gloves are essential items for planting. The end result of planting can be fresh produce that’s ready to eat, herbs that add flavor and aroma, or colorful blooms that beautify your backyard—the choice is yours!
What Is Growing A Plant?
Growing a plant involves nurturing a seed, seedling, or young plant and fulfilling its need for water, light, and nutrients until fully grown. It can take place outdoors in a field, backyard, or garden or indoors through pots, planters, and container gardens.
Plants undergo six growth stages: sprout, seedling, vegetative, budding, flowering, and ripening. They can also be classified according to their lifespan: annuals, biennials, and perennials.
In addition to daily or weekly watering, cultivation, fertilization, pest prevention, and disease treatment are other important activities involved in growing a plant. To grow strong and healthy, plants also need regular maintenance, such as pruning, repotting, and cleaning of leaves.
How to Grow A Plant?
Growing seeds to seedlings and into full-grown plants requires a few key elements, such as adequate water, ideal temperature, the right amount of light, and nutrient-rich soil or potting mix.
Every seed starts at a dormant or inactive stage and is just waiting for the right conditions to grow. Inside it, there’s a tiny plant embryo and a starchy food supply. When you provide the seed with the water, light, and warmth that it needs, it begins its journey to becoming a seedling!
To grow a plant, you’ll have to choose a pot, a garden plot, or a container with well-draining soil. Plant only high-quality seeds, and keep them moist in a bright spot. Monitor your seedlings’ growth daily, fertilize occasionally, and harden them off if you want to transplant them outdoors.
If you’re new to growing plants, a seed starting tray made of porous material can make it easier for you to grow from seeds. You can also use a seed-starting mix with special ingredients for germinating and sprouting or a self-watering system that waters your seeds at the right time!
How to Grow A Plant From Seeds?
Whether you want to have vegetables, herbs, fruit trees, or flowers in your yard, understanding how to grow your own plants from seeds is the first step to a fresh and flourishing garden.
The basic process involves choosing your favorite seeds, planting them in well-prepared soil, and making sure that all their watering, lighting, and growing needs are met. For best results, pay attention to your plant species’s precise requirements on the seed packet.
Here’s some guidance on how you can successfully grow lively plants from dormant seeds:
1. Select Seeds
Pick the seeds you want and make sure to get high-quality ones from a reliable seed company, local nursery, or garden center. It helps to do some research beforehand to find out which plant variety is a good fit for your climate, growing space, and soil type.
If you’re starting a garden from seeds, decide whether you want it to be a vegetable garden that’ll yield fresh produce for your dinner table, a herb garden with healing and aromatic plants, a flower garden with lovely and colorful blooms, or a combination of all three!
One good tip for beginner gardeners is to start small and choose the seeds of easy-to-grow plants, like marigolds, poppies, sunflowers, squash, beans, corn, peas, melon, and cucumbers.
Another tip is to pick locally produced seeds that are already acclimated to your environment.
Seed packets contain lots of useful info about a plant and its care requirements, so remember to read them while selecting your seeds. Look for disease-resistant varieties, like rust-resistant beans and blight-resistant tomatoes, which can help reduce your fungicide use in the garden.
2. Prepare Soil
Prepare the right kind of soil for planting seeds. If you plan on directly sowing your seeds in the garden, start by clearing the ground and removing weeds, rocks, and sticks. Loosen the soil, create an even surface for planting, and analyze your soil to see if it needs amendments.
The best soil for planting seeds is loam soil, which has a balanced mix of clay, sand, and silt. If your soil is too compacted, too sandy, too acidic, or too alkaline for your plant, you can improve it by mixing limestone or organic material like compost, well-aged manure, and peat moss.
Meanwhile, if you choose to germinate your seeds in a container before planting, you can use a seed starting mix as your growing medium. The seed-starting mix is a special kind of soilless potting mix that’s fine-textured and well-draining, creating the best environment for your seeds.
It usually contains perlite, peat moss, vermiculite, and sand. Add the seed starting mix in a container with drainage holes and moisten it before planting your seeds.
3. Planting Procedure
Check your seed packets to find the correct planting depth, season, and technique for your plant. Different types of seeds have varying needs during the planting process.
For instance, the seeds of some species, like tomatoes, eggplants, and peppers, need to be planted in a container and germinated indoors if you live in an area with a cold climate. Other species, like carrot seeds and cucumber seeds, can be directly sown into the ground.
If you’re planting a vegetable or a shrub with large seeds, the general rule is to plant each seed at a depth of three times the diameter of the seed. Small seeds that need light to germinate should be sown on top of the soil with just a light sprinkling of soil on top.
It’s important to keep the newly planted area moist, so gently water your seeds with a mister or watering can right after planting. Pay close attention to moisture levels in your soil for the first few weeks, and lightly water every 1 or 2 days or twice a day when the weather is hot.
When the cotyledons of your young plants wither, and their “true” leaves form, apply a balanced fertilizer to encourage healthy roots and speedy growth. Use a water-soluble fertilizer and dilute it to avoid overwhelming the seedlings. Apply every two weeks for lush results!
What Are the Requirements for Seeds to Grow?
Seed germination is the process where seeds grow into young plants or seedlings. For this to take place, favorable conditions involving water, oxygen, light, and temperature are necessary.
Did you know that dormant seeds come with a food supply in their embryos? They use up these reserves while observing their environment and waiting for ideal conditions to germinate.
When seeds are exposed to the right environment, they absorb water and oxygen into their seed coats, and their embryos start to enlarge. After some time, their seed coats break open, and their roots emerge, followed by shoots that contain lovely leaves and stems!
As gardeners, our goal is to provide the optimal requirements for our seeds to grow into healthy and happy plants! These include:
Water
Water is vital for seed growth. It provides hydration for the growing embryo, converts stored food into its usable form, and softens the protective seed coat so that the seed ruptures properly.
Some seeds, such as sweet peas, morning glory, beats, pumpkin, corn, and cucumber, have tough and dry coats. They’ll need around 6 to 24 hours of soaking before sowing in order to germinate. The exact number of hours is usually stated on the seed packet.
If you’re using a potting mix for growing your seeds, loosen and dampen it evenly before planting. Aim for it to be moist but not dripping wet, with no dry clumps. After planting, use dampened potting mix again if you need to cover up the seeds.
It’s also a good idea to mist water on top of your newly planted seeds to prevent the soil from drying out. Moisture is of the utmost importance during the first few weeks of seed growth, so check your soil daily by feeling for dampness with your finger or using a moisture meter.
Oxygen
Oxygen is just as important as water when it comes to planting seeds! It provides essential energy for seed growth. Germinating seeds use oxygen found in the pores of soil particles to produce energy from their food through a process called aerobic respiration.
If a seed is buried too deeply or planted in hard-packed and saturated soil, it’ll be deprived of oxygen, and this can prevent germination from taking place. That’s why it’s important to use lightweight, well-draining, and loose soil mix when growing seeds.
Vermiculite and perlite are popular amendments that improve the structure of your soil, allowing oxygen-rich air pockets to form. These are good options if you’re working with heavy soil. They’re long-lasting and sterile, so you won’t have to worry about introducing harmful bacteria.
Light
The right light is necessary for seeds to start growing. Some species, like poppies and petunias, require the stimulus of light for germination. It’s best to press them in the soil, uncovered. Other species need you to sprinkle over them with soil while keeping the seeds close to the surface.
On the other hand, seeds such as calendula, periwinkle, and marigold prefer darkness for germination! You’ll have to bury the seeds at the depth indicated in their seed packet. Be careful not to plant them too deep, as they might not have enough energy to push above the soil.
After germination, seedlings will require intense light for 12 to 16 hours per day. If you’ve planted them in containers, position them near a sunny window and provide additional light via LED grow lights. It’s also important to give them several hours of darkness at night.
Temperature
Seeds need to reach their ideal temperature to germinate, too! Most seeds germinate at a soil temperature ranging between 68°F to 86°F (20°C to 30°C). Tomatoes and peppers prefer temperatures on the hotter side of the scale, while lettuce likes it cooler.
Once they’re done germinating, many seedlings prefer a daytime temperature of 65°F to 70°F (18°C to 21°C) and slightly cooler temperatures at night, according to Iowa State University’s Horticulture News.
Some gardeners like to use a heating mat to provide extra warmth for their seeds. All you have to do is put the heating mat under the containers so that it can heat the soil. Remember, you shouldn’t place your seeds under hot and direct sunlight as it can kill them!
How to Plant a Plant?
When planting a plant that you’ve gotten from a garden center, greenhouse, or local nursery, the goal is to transfer the plant into the ground with as little root disturbance as possible. The best time for planting is late afternoon or on a cloudy day to avoid stressing the plant with heat.
Some gardening tools and supplies that will come in handy for planting include a trowel, a watering can, a pair of garden gloves, a knife, and organic compost to enrich your soil. Follow these steps, and you’ll have a healthy and well-established plant in your garden in no time!
1. Dig a Hole
Use a trowel or a dibber to dig a hole that’s twice as wide as the root system of your plant. When it comes to the depth of the hole, make it deep enough to cover the rootball.
Consider the type of plant you have in determining the right hole size. Some plants, like tomatoes, require deep planting holes, while strawberries prefer shallow holes. For annuals and perennials, they do well in holes that are twice as wide and deep as their original containers.
Most plants need 6 to 8 hours of sunshine each day—so pick a bright spot before you dig! Avoid digging and planting right after rain, as the soggy soil can compact when it dries. Young plants have tender and fragile root systems that might not survive in heavily compacted soil.
If you plan on planting more than one plant, observe proper spacing for the holes. Most plants require 6 to 12 inches of space between each other. If possible, dig holes in the flat and even part of your garden because it can be more difficult to grow plants on sloping land.
2. Mix Organic Compost With Loose Soil
Prepare the soil by loosening it with a handy trowel. You can also use a garden rake or hoe if you’re working with a large garden plot. This step aerates the soil, making it easier for your plant’s roots to spread out and absorb water, oxygen, and nutrients from the ground.
Loosen around 6 to 8 inches of the topsoil, and avoid walking on it as this compacts the soil. Don’t forget to take care of weeds and grass beforehand, as they compete with your plant for light, water, and nutrients. Clear the ground of rocks and pebbles that interfere with planting.
Another important step is to enhance your loose soil by adding nutrient-rich organic compost. Compost contains decomposed organic matter that works wonders for your soil! It introduces beneficial bacteria, retains much-needed moisture, and keeps the soil nicely aerated.
Spread a 2 to 3-inch layer of compost on top and mix it into the loose soil with a rake or trowel. You can buy it in bags at garden centers and home improvement stores or make it yourself. Compost is the key ingredient in creating garden soil that’s dark, moist, crumbly, and full of life!
3. Remove Plant’s Container
Water your plant well one hour before planting to reduce transplant shock and to keep the root ball moist and easy to manage. When removing the plant from its container, handle it as gently as you can and avoid disturbing the roots by pulling it out of the pot.
One good tip is to turn the container upside down or sideways and smoothly slide the root ball out of the pot. Depending on the size of your plant, you can use a trowel or your fingers to lift the soil and root ball of your plant from the bottom.
If the plant is root-bound and not coming out, no worries! Hold the stem in between your fingers while in the upside-down position, and lightly tap or squeeze the bottom of the container until the root ball is released. You can also cut your container open on the sides using a regular knife.
Only remove your plant from its container when you’re ready to plant it into the ground to minimize exposure to air. Root exposure can kill your plant’s fine root hairs, which are responsible for absorbing moisture and nutrients. It’s best to keep the roots damp and covered.
4. Planting Procedure
Place the young plant inside the hole and backfill it with the mixture of loose soil and organic compost you’ve prepared earlier (step 2). Gently tap down the soil with your hands supporting the plant. Be careful not to pack in the soil around the roots, as this can cause compaction.
Water your plant thoroughly after you finish planting to settle down the soil. Doing so also reduces transplant shock and prevents leaf and stem damage according to a study by Steve Reiners from Cornell University. Use a watering can or spray nozzle to water your plant, and do it gently to avoid washing away the soil.
You’ll need to check the soil moisture of your plant for the first few weeks after planting and water it every 1 or 2 days to prevent it from drying out. To promote plant growth, use a starter fertilizer solution for your plant and follow the instructions on the label to dilute it properly.
Continue to remove weeds around your new plant as it grows, and add mulch to improve the soil quality and further suppress the weeds. Don’t forget to label or section off the area using fencing or twine to prevent people or animals from damaging your plant. Mission accomplished!
What Does Planting Plants Require?
Planting plants requires five essential elements: light, water, nutrient-rich soil, air, and the right temperature. Each plant is unique and will have specific requirements on the amount of these elements. Once you meet its needs correctly, the plant will survive and thrive.
One common mistake that gardeners make is planting a plant in an area with insufficient sunlight, waterlogged soil, or soil that’s lacking in nutrients. Another error is to choose the wrong variety of plant. To succeed in planting, you must have the “right plant at the right place.”
The best way to plant a garden is to have your soil tested and improved with nutrients before you start planting. Plants need at least 16 nutrients, including phosphorus, potassium, oxygen, carbon, and nitrogen. To fix a nutrient deficiency, you can add organic fertilizer to your soil.
You’ll also need to consider plant spacing for proper airflow and mulching to minimize weed growth. Some gardening tools that you’ll need when planting plants are a trowel, dibber, labels, watering can, potting soil scoop, standard knife, pruners, and a pair of garden gloves.
How Much Water Is Required to Grow a Plant?
Newly planted seeds and young seedlings require light misting or gentle spraying of water every 1 to 2 days to keep the soil moist but not wet. Older plants require less frequent watering. Around once or twice per week may suffice, depending on the season and the type of plant.
One way of checking if your plants need water is to do a finger test. Simply stick your finger into the soil and see if the top inches are dry. If the answer is yes, it’s time to water! You can also lift your pots or trays to see if they’re heavy with water or use a soil moisture meter for accuracy.
According to the University of Minnesota, watering from the bottom is a great way to ensure even watering among your plants and helps prevent diseases by keeping their foliage dry. It’s also a better method for seedlings that might get dislodged by watering from above.
How Much Sunlight Does a Plant Need for Growth?
Germinating seeds and young seedlings need 12 to 16 hours of bright sunlight per day. Meanwhile, larger and more mature plants will need 6 to 8 hours of sunlight daily to grow.
If you’re growing plant seedlings indoors, it’s best to place them near a sunny and south-facing window. Do you notice your seedlings leaning towards a lamp or a window? Chances are, they need more light! When left unattended, this can cause your seedlings to develop weak stems.
You can use artificial lighting, such as LED grow lights, to achieve the right amount of light for your plants each day. Position the lights around 2 to 3 inches from your seedlings.
On the other hand, older plants can be divided into three categories based on their sunlight requirements: low-light plants, medium-light plants, and high-light plants. Low-light plants can get by with only 2 to 4 hours of sunlight per day, while medium-light plants need 4 to 6 hours.
High-light plants need 6 to 8 hours of sunlight to thrive. Pale green stems and foliage, unusually small leaves, leggy stems, and yellow and falling leaves are signs that your plant isn’t getting enough light, according to the Division of Plant Sciences of the University of Missouri.
What Is a Good Potting Mix for Planting in a Container?
Soilless potting mix is an excellent choice for container gardening, whether you’re planting indoor or outdoor potted plants or starting seeds. This type of mix is lightweight, well-draining, holds the right amount of water and nutrients and is free from insects, diseases, and weeds.
Additionally, soilless potting mix doesn’t compact and provides plenty of air space, allowing tender roots to grow. This is important since a plant can’t survive if its roots lack air.
A good potting mix will often contain an organic ingredient, like peat moss, composted bark, or compost. It’ll also have vermiculite or perlite to improve water drainage, sand to add air space, a small amount of ground limestone, and fertilizer to supply nutrients to the plants.
It’s vital to be aware of the ingredients of a potting mix to see if it’s a good match for your plants. Standard all-purpose potting mixes work well for most container plants, especially vegetables and annuals, according to the garden specialists at the University of New Hampshire.
You’ll need a specialty potting mix if you plan to grow succulents, cacti, or orchids in containers, as these plants require faster drainage and a specific pH level to thrive.
How to Transplant a Seedling?
To successfully transplant a seedling, you’ll first need to harden it off to the outdoors, which means gradually exposing it to direct sunlight, strong winds, heavy rains, and temperature fluctuations that weren’t present while it was growing in a sheltered indoor environment.
This process should be done around 7 to 14 days before transplanting to allow the seedlings to acclimate and reduce the risk of transplant shock. Start by bringing your seedlings out in a shady spot for a few hours each day and then slowly build up the number of hours.
You also have to prepare your soil for growing plants before transplanting. According to the science book The Science of Plants by Tom Michaels; Matt Clark; Emily Hoover; Laura Irish; Alan Smith; and Emily Tepe the soil needs to be well-draining and airy enough for your seedlings’ tender root systems. Use a hand trowel to dig holes that are deep enough for the root balls to fit.
Carefully transfer the seedlings into their new homes on the ground, cover them with soil, and lightly tap around the roots. Water them again, and you’re done!
What to Do When Planting Bare-Root Plants?
When planting bare-root plants, one of the first things you should do is check for rotten root sections and trim these off beforehand. Bare-root plants need to be planted immediately. If it’s not possible, keep them chilled in a cool, dark place but not frozen until it’s time for planting.
Remember to keep exposed roots moist because dried-out roots can kill the plant. According to Oregon State University it’s also advisable to soak the root zone of bare-root plants, such as strawberries, asparagus, tulips, peonies, and roses, for 30 minutes to an hour to fully hydrate them before planting.
Dig holes that are twice as big as the root systems of your plants without crowding or bending. After putting them in, lightly fill and pack the soil until it’s level with the ground. Water well after planting. It can take up to four to six weeks before you see signs of growth in your plants.
What to Do to Prepare a Garden for Planting?
To prepare a garden for planting, clear the ground first by removing weeds, grass, and rocks. The next step is to test your soil to find out about its nutrient levels. Make the necessary improvements by adding organic matter, such as two to three inches of compost.
You’ll also need to prepare your garden plot by tilling the top inches of soil using a rototiller, spade, or shovel. This will allow your plants to grow healthily and gain easy access to oxygen, water, and nutrients in the soil. Ensure that your garden has a convenient water source close by.
When planning the size of your garden, consider the type of plants you’d like to grow. Provide enough spacing to allow proper air circulation and sufficient sunlight exposure.
What Are Common Plants to Grow?
Some of the most common plants to grow in gardens include flowers like roses, hydrangeas, peonies, tulips, sunflowers, and lavender, as well as herbs like thyme, basil, sage, and oregano. Succulents, ornamental grass, and edible plants, such as strawberries, are also popular.
When it comes to vegetable gardens, the most common plants to grow are tomatoes, lettuce, peas, cucumbers, onions, garlic, green beans, carrots, peppers, sweet corn, and squash.
As for indoor plants, the most common ones are spider plants, aloe vera, peace lilies, jade plants, African violets, snake plants, philodendrons, and English ivy. These plants require minimal care and are capable of thriving under low light conditions inside homes.
If you’re a beginner gardener, you might want to start with easy-to-grow plants from seeds. As for experienced gardeners, you can grow your collection and expertise by looking at all types of plants and selecting the ones that are best suited to your garden environment.
According to Oklahoma State University’s Division of Agricultural Sciences, you should also consider plants’ bloom times, maturing height, water requirements, texture, color, and form when deciding which plants to grow.
Popular plant families to choose from include Araceae (Arum Family), Orchidaceae (Orchid Family), Lamiaceae (Mint Family), Zingiberaceae (Ginger Family), Rutaceae (Citrus Family), and Marantaceae (Prayer Plant Family).
How to Plant Alocasia Macrorrhiza
Plant Alocasia macrorrhiza in a pot or in your garden under partial shade. Use regular potting soil, bark, and sand to create a nutrient-rich and well-draining soil. Care for Alocasia macrorrhiza includes watering once or twice a week when the top two inches of soil are dry. This plant is a fast grower, so you may have to repot every 6 to 12 months.
How to Plant Alocasia Longiloba (Tiger Taro)
Alocasia longiloba grows best in a partly shaded spot and can thrive both indoors and outdoors. It loves a warm and humid environment and needs well-draining soil to avoid root rot. Care for Alocasia longiloba includes weekly watering to stay moist as well as regular wiping of leaves to remove dust and encourage photosynthesis.
How to Plant Alocasia Cuprea
Plant your Alocasia cuprea in aerated and nutrient-rich soil, ideally with peat moss and perlite. This plant thrives in bright and well-lit conditions at normal room temperature and above-average humidity. Care for Alocasia cuprea includes watering 2 to 3 times a week and applying slow-release fertilizer monthly during the growing seasons.
How to Plant Alocasia x Amazonica
Plant Alocasia x amazonica indoors using a lightweight and well-draining potting mix. Place it near a bright window and water when the top two inches of soil begin to dry. Care for Alocasia x amazonica includes fertilizing every 2 to 4 weeks during its growing season with a water-soluble fertilizer and keeping its lush leaves clean at all times.
How to Plant Alocasia x Amazonica ‘Polly’
Alocasia x amazonica ‘Polly’ needs rich and moist soil with an acidic pH and part shade lighting conditions to thrive. This plant requires high humidity, warm temperatures, and watering twice a week. Care for Alocasia x amazonica ‘Polly’ includes pruning to promote leaf growth and fertilizing every two weeks during the spring and summer seasons.
How to Plant Alocasia Zebrina
Plant your Alocasia zebrina in moist soil in a container with ample drainage holes. Maintain a warm temperature and constant humidity for your plant, and ensure that it receives lots of filtered light daily. Care for Alocasia zebrina includes monthly fertilizing in the spring and summer. Keep an eye out for pests like spider mites and mealybugs and problems like root rot.
How to Plant Black Velvet Alocasia Reginula
The Alocasia black velvet or Alocasia reginula favors acidic or neutral soil, preferably with bark, sand, and loam, and partial sunlight from a north or east-facing window. As a tropical plant, it thrives under warm and humid conditions. Care for black velvet Alocasia reginula involves watering when the top 20% of the soil is dry and repotting every couple of years.